
Useful information on installing a STARLINK satellite internet dish on a pole
This page is purely about the installing of a Starlink dish, particularly installing it on to a longer pole. This article is not about the system's technical specifications or effectiveness and we do not sell the Starlink system. However, we do stock an extensive range of components to install Starlinks.
Installing your own Starlink really is pretty easy, in some ways it is easier than installing a conventional satellite dish, or even a TV aerial, because the Starlink dish aligns itself (Starlink Mk1 and 2 only, the Mk3 dish needs aligning by using the "app") !
Subject list :
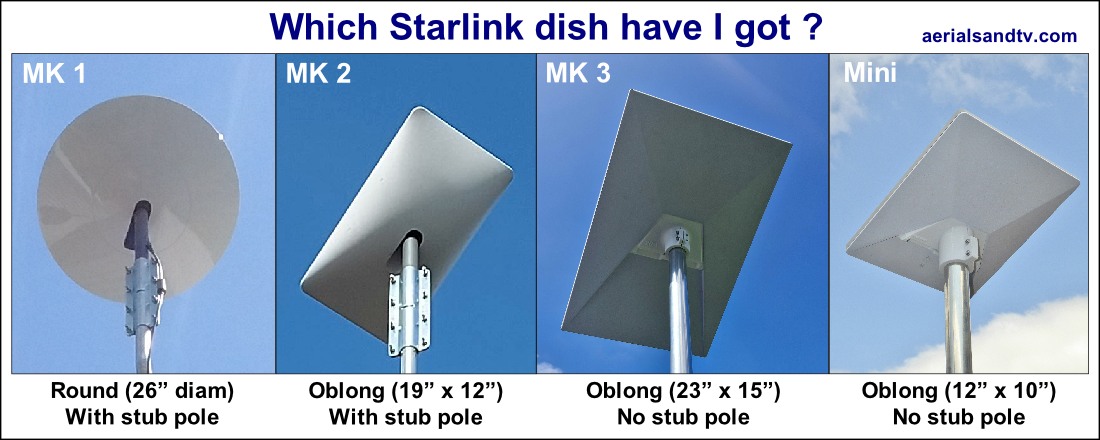
- Which Starlink dish have I got ?
- Field of view required for Starlink
- - Minimising movement in the dish
- How strong is that Starlink installation ?
- Starlink Mk 3 dish (incl "Version 4")
- - Starlink pole adapters (what to check)
- Starlink Mini
- Starlink Mk 2 dish & pole
- Starlink "High Performance" dish
- Mounting a Starlink on a longer poles
- Pole & brackets recommendations for Starlink
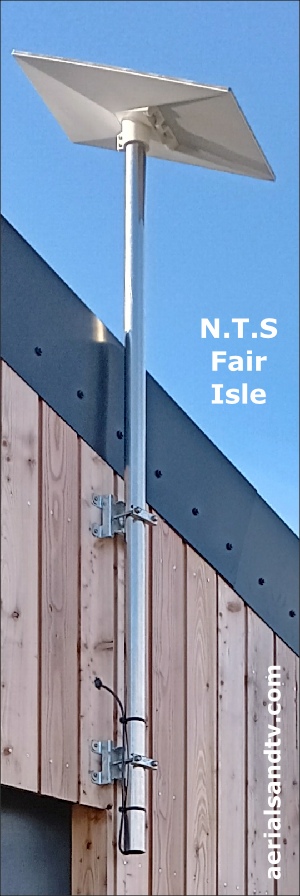
- Mounting a Starlink on a metal clad building
- Mounting a Starlink on a flat roof
- Size of hole needed for Starlink cable
- Lightning and Starlink
- Starlink installation kits
- 1.5" pole coupler (fits Starlink Mk1, Mk2 & High performance)
- Starlink Mk3 (incl V4) pole mount
- Starlink Mini pole mount
Also see :
- Customers' Starlink installations
- Inside a Starlink dish (external link)
Starlink required field of view of the sky /siting your Starlink
Starlink requires a 100 degree cone unobstructed view of the sky. This "cone" is generally tilted slightly in a particular direction according to one's location (e.g. in the Midlands and North of England it is generally south west), the Starlink App informs you which direction would be best in your location. That said, it is arguable how much difference the direction actually makes ! Anyway, the width of the cone should improve (i.e. the requirement may well drop to less than 100 degrees) as more satellites are put into orbit. It must be said we have had reports that the Starlink "app" is sometimes "unreliable and doesn't give repeatable results".
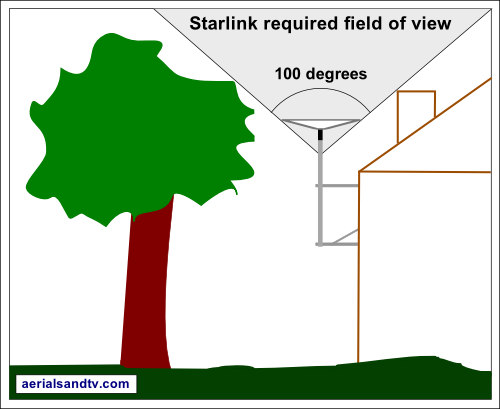
To be frank it's not exactly difficult to check if there is a 100 degree unobstructed cone above the Starlink is it? If you haven't already got one I'd just buy a protractor... A refinement is to take a photo of the potential site (for the Starlink install) from as high as possible and/or as far away as possible, then use that to check out the angles and dimensions. The latter by taking relative measurements to something of known size (e.g. a window) in the picture at approximately the same distance from the camera as the proposed installation.
If mounting the Starlink next to a pitched roof obviously the pitch of that roof is critical as to how long the install's pole needs to be to give the 100 degree cone. If the pitch of the roof (from the horizontal) is 40 degrees or less then theoretically the Starlink does not need to be any higher than the gutter level. Remember that it's easier to check the pitch of your roof in the loft rather than climbing up to roof height !
Starlink recommend installing the dish in the highest elevation possible consistent with safety, but not neglecting the rigidity of the install as ideally one should be aiming for minimum movement in the mounting. I am only an expert in the mounting of aerials / satellites / Starlinks, not how they actually work, but installers have told us that Starlink will still work fine with a certain amount of movement in the pole but bandwidth and latency can be negatively affected. What is for certain is that the less movement in an installation the stronger it must be and therefore the less chance of failure due to high winds. Longer poles have more flex in them, though that can be countered by using masts of increased diameter and/or wall thickness (see pole tests), or using guy wires. Minimising the length of the pole and maximising the separation of the brackets (if using two) will increase stability. Ultimately use a 2" diameter pole, or, most stable of all, a scaffold pole.
It makes sense to try and install Starlink in a sheltered spot if possible, but that may be incompatible with getting the required unobstructed view of the sky! Just like aerials and satellites generally we recommend keeping Starlink out of any smoke as far as possible.
How strong is that Starlink installation ?
Unfortunately there is a (fairly) infallible rule about Starlink installations, most of those that look really neat (particularly the OE ones) aren't actually that strong
See ATV Starlink installation kits. [link]
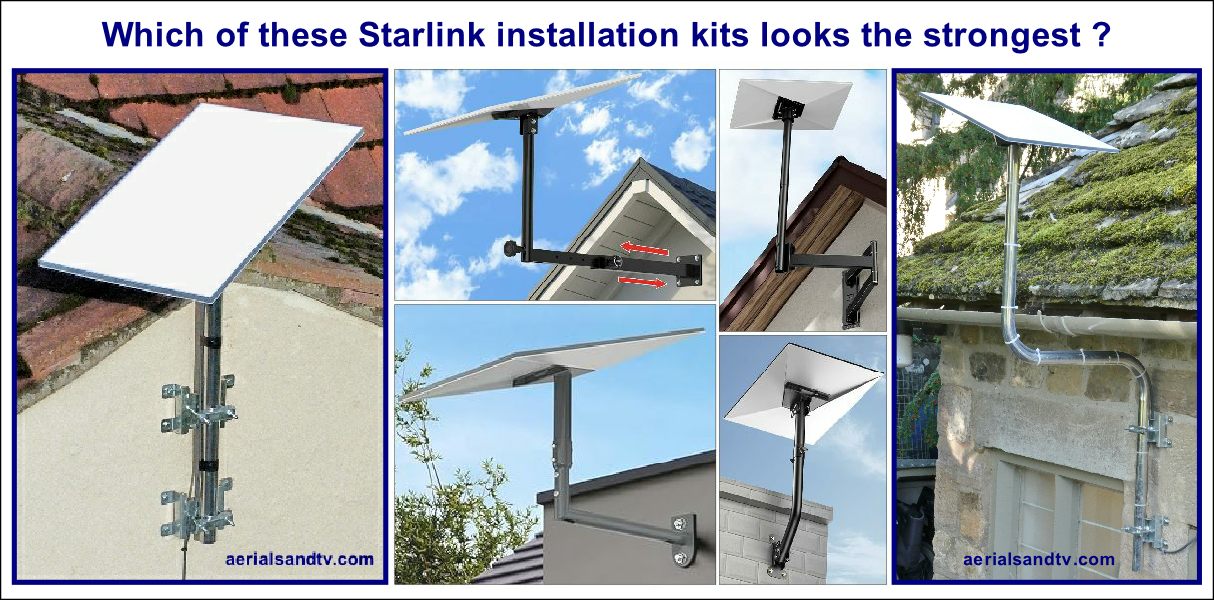
The above picture is self explanatory, or should be !
Starlink Mk3 dish
NOTE : The Starlink Mk3 "V4" is, for installation purposes, the same dish.
In early 2024 Starlink changed their design again (it's the modern disease, always having to change stuff, and not usually for the better).
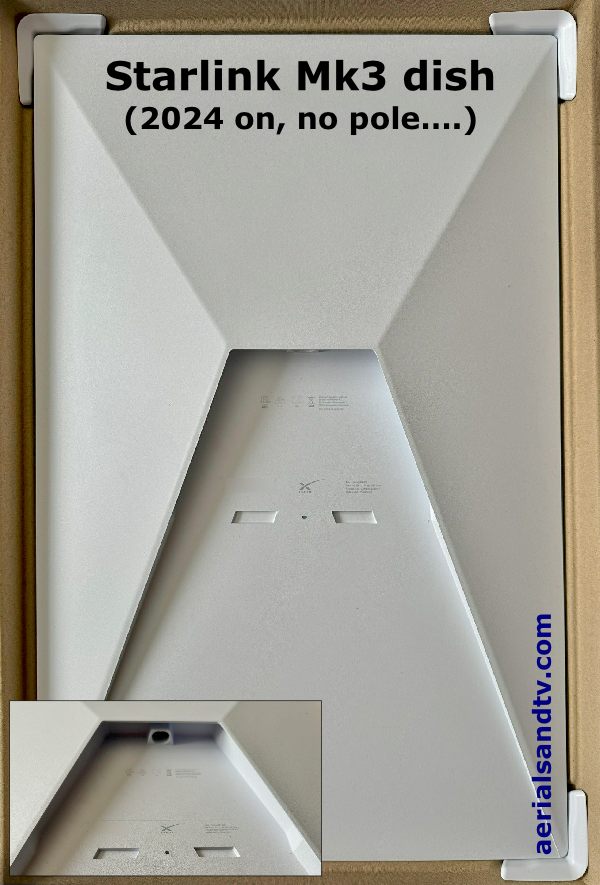
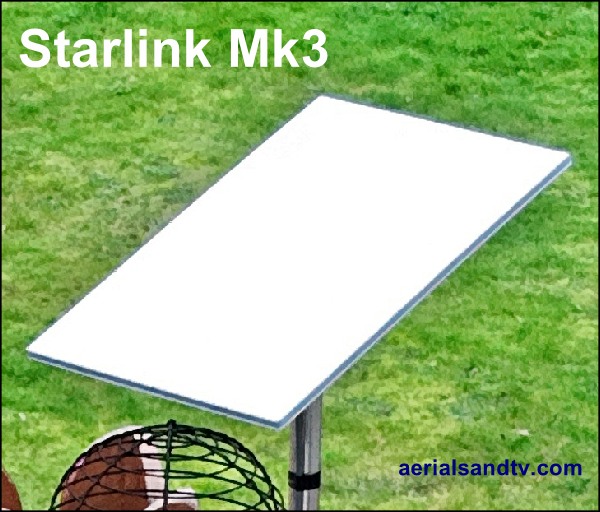
The generation 3 / Mk 3 dish is the slightly bigger than the Mk2 at 23" x 15" but it no longer comes with a stub pole, so if you want to mount your Starlink on a pole you will need an adapter which slots onto the back of the dish. Incidentally, all pole adapters are attached to the dish by either plastic clips or, on some adapters, screws which press into ones dish !
The official Starlink "pipe adapter" is the same piece of poor design as that for the Mk1/2 dish..... It uses screws to enable it to fit different diameter poles, a poor idea, and the depth of it is insufficient. The first version was appalling, the updated one was better, but still "sub optimal".
The Starlink no longer self aligns, it is fixed, so this must be done at installation using the Starlink app by rotating the pole it is installed on, which, incidentally, means installing it on a straight pole (rather than a cranked pole) makes that a bit easier !
Our thanks to Craig from Newcastle for the pics of the Mk3 dish.
Starlink pole adapter plates : what to check for
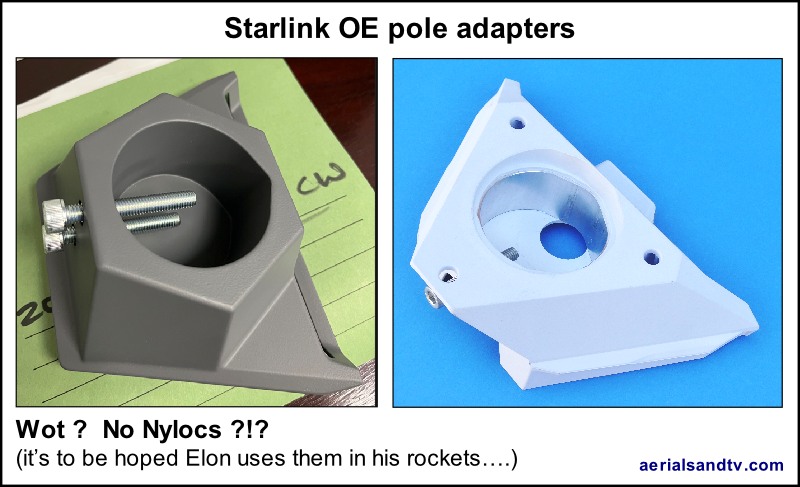
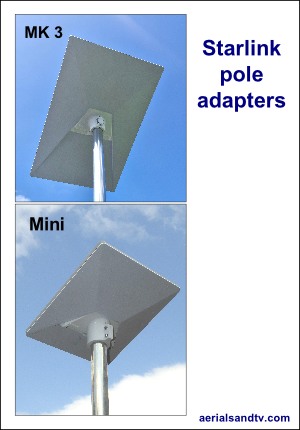
Below are pictures of "genuine" Starlink pole adapters, left = for Mk3 dish, right = Mini dish. The Mk 3 adapter is the improved version, the first type only had one screw in it !
Of note is that, like their Mk1/2 pole adapter, they are designed to fit poles of different diameters which means they only have to manufacture and stock one, which is better for them, but "sub optimal" for the actual installation...... Obviously a 2" pole would be the most stable as that would be the best fit, but that would be relatively speaking because the "socket" is not really that deep.
I can only say I hope it's not the same engineers who designed their pole adapter who design their space craft.....
There are many pole adapters available, Starlink's own (see above) plus many different after market ones, so it can be quite confusing as to which is the best. Some points to watch for are below :
1 – How much of the pole is clamped on to the adapter ? Obviously the longer the length of pole "clamped to" then the more stable and secure it will be.
2 – Does the adapter clamp round the pole or is it held on by screws on the side ? The all round clamp type is obviously far superior.
3 – Is the adapter specifically made for the diameter of pole you are using ? The use of screws to “take up the slack” is a poor idea and cannot possibly be as secure and/or stable.
4 – If the adapter is made of plastic how thick is the plastic ? And is it UV resistant / stabilised ?
5 – Are the screws / nuts stainless steel or plated ? If any nuts are used are they Nyloc ?
6 – In the case of metal adapter plates :
a - How does the plate secure itself to the Starlink ? And if it uses screws will that damage the Starlink and what is to stop them coming loose ?
b – If the plate is made of steel what is the anti corrosion finish on the metal ? I have seen “stainless steel” ones for sale but they are, apparently, also painted ?!? Nobody would paint a stainless steel bracket, which makes one wonder if they really are stainless steel.....
c – How are the screws tapped into the metal ? Do they use captive nuts or do they just cut a thread through the thin steel sheet ?
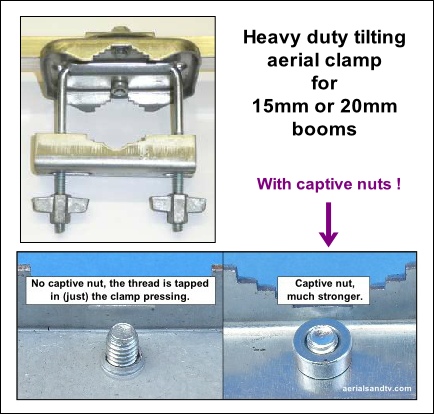
We believe the adapter we sell (in two versions for either a 1.5" or a 2.0" diameter pole) is, all things considered, the best on the market at the moment.
Compare it to Starlink's own pole adapter (above), I think pictures speak louder than words.
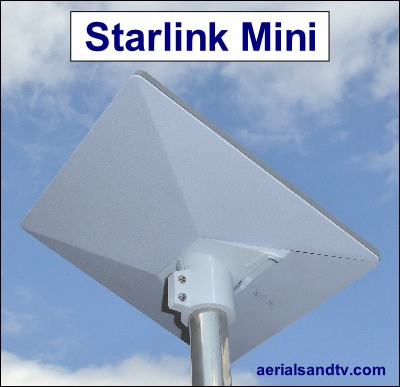
Starlink Mini dish
The Starlink Mini was bought out in Summer 2024 and looks similar to the Mk3 but is smaller (12"x10" rather than 23" x15"). I'd have though that would negatively affect its gain but also make it cheaper and it'd have less wind loading.
It has a built in WiFi router (the supplied cable is purely for the power) which is good, in theory. The problem is it'd be mounted outside, with the wall shielding the rooms from the signal, which is obviously bad. Thus it also possible to connect it to an internal router using a Ethernet cable.
But this page is not really about the Starlink's technical operation, it is about how to make a decent job of fitting it on the wall (or where ever). For that the important information is that - like the Mk3 - it requires a pole adapter to mount it on, err, a pole. It comes with one of the latter as standard but since it is designed to fit a variety of pole diameters it cannot, and does not, do a particularly decent job of that, especially as it only has one screw to clamp it up ! We recommend a pole any pole adapter that is designed for a specific diameter pole : see pole adapter plates (what to check).
Starlink Mk II ("2nd Generation dish") pole dimensions
As of 2024 this model also appears to be called the "standard actuated"
These dimensions are of great relevance if considering alternative methods of installing Starlink on a longer pole without using Starl think's pole adapter (which is "sub optimal" in the design department, to put it mildly, let's just be honest about it), see section below.
As of November 2021 Spacex / Starlink started supplying a smaller "Generation 2" rectangular dish. It is 19" x 12" with a similar mast diameter to the original. It is a significant improvement in design because you now have a choice as to whether the cable should exit above the pole (that it is being installed on) or be routed down inside the pole. In the case of the latter, which in most cases would be the neater option anyway, it actually makes the pole 1.5" pole coupler even more suitable because more of the Starlink's pole (up to about 14.5cm of it) can be inserted into our recommended coupler which results in an even more stable install.
One final point, try to ensure the cable (where it exits the pole at the bottom) cannot move in the wind and wear on the edge of the pole, and/or mitigate that by "deburring" / smoothing off the inside edge of the pole and wrapping tape round the cable at that point. Chaffing of the cable should be less likely at the top of the pole because the cable is sheltered from the wind by the coupler and directed into the middle by the Starlink's own pole, though I still would ensure the inside of the pole is deburred.
See customer install of a Mk II Starlink dish.
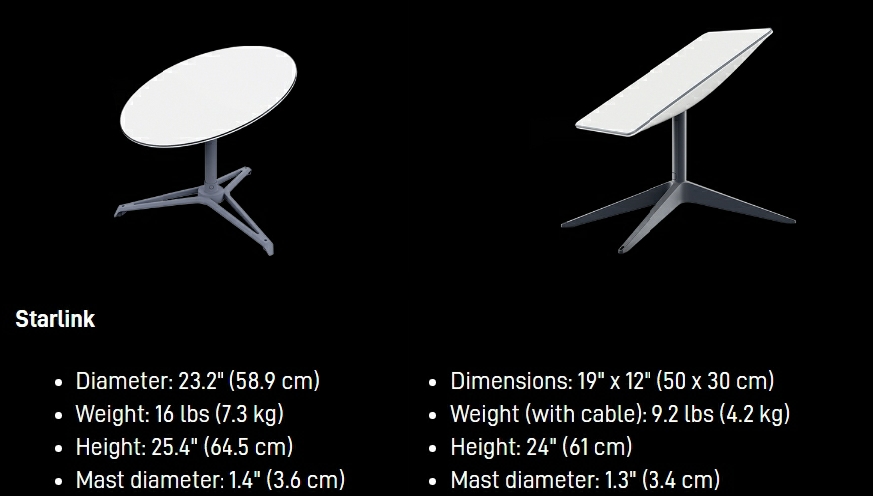
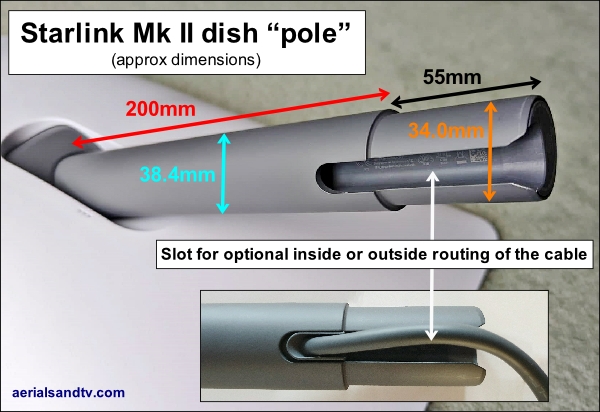
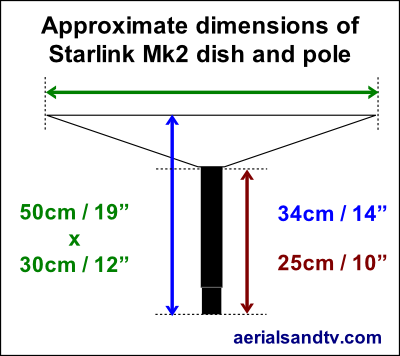
It will be noted that the and "spigot" on the MkII dish is a smaller diameter (approx 34.0mm) than that of the MkI (approx 36.0mm). Since the internal diameter of a 1.5" x 1.6 mm (wall thickness) pole is 34.7mm one can actually sleeve the spigot section straight into the pole. But because that spigot section is only about 2" long I personally would not be relying on just doing that (i.e. without using a pole coupler as well), particularly with an expensive Starlink dish.....
Starlink Business High Performance dish
Starlink have a habit of playing about with the names of their products which is "unhelpful", the article below is specifically about the 1st model of High Performance dish. However, the most important lesson to learn about installing High Performance dishes is the same for all models : namely that they are bigger and therefore will put more load (most significantly increased wind loading) on any pole / bracket they are mounted on. As an example we'd only recommend putting a High Performance dish on one of our 6ft x 1.5" poles if it were in a reasonably sheltered location, otherwise we'd shorten it, cutting just one foot / 30cm off it will significantly strengthen the install.
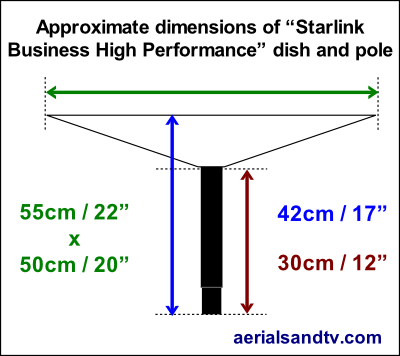
In late 2022 Starlink bought out a "Business High Performance" dish. Apparently it has a significantly enhanced performance though on this page we are soley concerned with issues affecting its installation.
The dish size has increased from 19" x 12" to 22" x 20", i.e. its surface area has gone up from about 228 square inches to 440, and that's a whopping 93% increase. Of most concern is the resulting increase in the wind loading which, when combined with its increased weight (from 9lbs to 16lbs), means an even more rugged mounting is to be advised. What this means is any poles we recommend for the standard dish may not necessarily be suitable for the bigger dish, depending on the exposure of the site. We are, however, confident our 4ft x 1.5" poles (either straight or cranked) would be fine. If a longer pole than that is necessary then stay wiring would be advised, particularly in exposed locations. If that is not practical please contact us for advice.
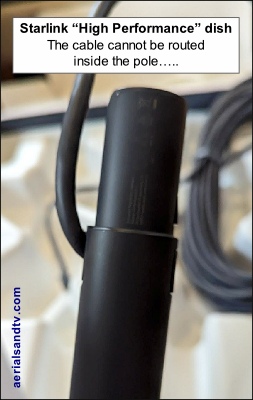
The cable cannot be routed down the inside of the 'high performance Starlink' pole, which limits the length of the latter that can be clamped to and thus the install's strength. By far the best solution we have heard of comes from Steve at Fastdog (see picture). He drilled a 32mm hole in one half of the 1.5" pole coupler using a standard multi-material holesaw. The cable can then be routed through said hole and hey presto, a seriously strong install of a Starlink High Performance dish!
The man's a genius......
Make sure the cable is kept well away from the edge of the hole as you do not want it rubbing on it in any winds.
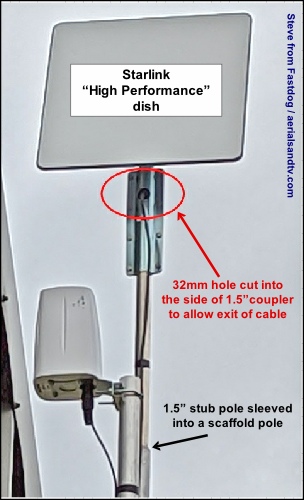
Of additional interest in the picture is that Steve needed to install the dish on a longish pole, i.e. too long for a pole of only 1.5" diameter. So he sleeved a section of 1.5" diameter pole into a scaffold pole, then clamped the dish onto that.
Installing a Starlink on a longer pole
When calculating how long you need your pole to be remember that the Starlink Mk1 or Mk2 comes on a short pole, approx one foot long, and if using a 1.5" pole coupler (as opposed to clamping it on to the side) all of that length will be in addition to the length of the pole you are fitting it on.
The Mk3 dish or the Mini does NOT come with a stub pole !
NOTE : When installing an aerial or a satellite dish on pole you would almost always install the item on the pole then install the pole on the bracket, unless the top of the pole was very easily accessible (which it isn't usually).
If I was attaching a Starlink to a pole it would depend on the length of the pole I needed :
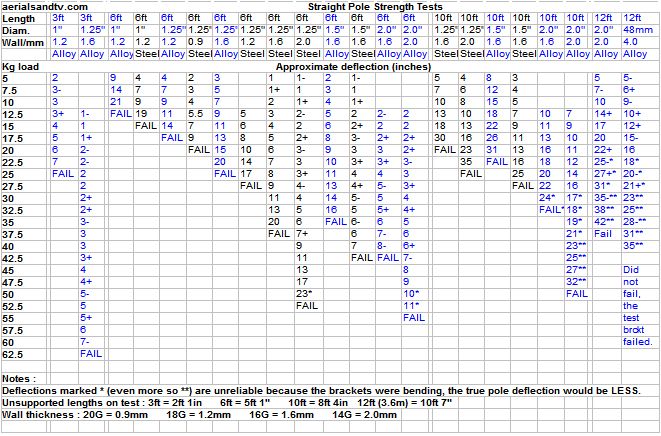
For a medium length alloy pole, up to a 5ft unsupported length - i.e. above the top bracket clamp - a 1.5"diameter x 1.6mm wall thickness mast would be perfect.
Mk III version = use a Starlink Mk3 pole adapter.
Mini version = use a Starlink Mini pole adapter (it comes with one but it is not particularly well designed)
Mk II version = Route the cable inside the pole then push the Starlink pole as far into the pole coupler as it will go (which is normally about 14.5cm).
This install method would certainly be far stronger and more stable than the "genuine" Starlink" pole adapter (which, TBH, is a pants idea). If fitted correctly any wind would have damaged the Starlink (or blown your roof off....) way before the coupling would fail.
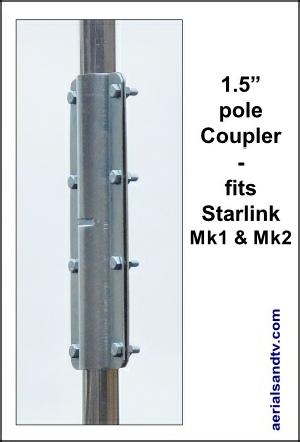
Mk I Starlink = clamp the coupler as far up the pole as possible, i.e. over the wider 1.5" section and up to just below the cable exit point.
[link]
If I was using 1.5" x 1.6mm (wall thickness) steel masting I would go up to around 7ft unsupported length. The problem is that's a non standard size steel pole and the standard wall thickness for 1.5" steel poles is only 1.2mm which is not significantly stronger than a 1.6mm wall alloy pole.
Steel rusts of course so pretty much all steel masting is galvanised, but pre galv (which is by far the most common) has very much thinner protection than hot dip galvanising, in fact they're like chalk and cheese, see pre galv v hot dip galv corrosion resistance. The problem is it is very difficult to get hold of hot dip galv steel poles because they are a lot more expensive to manufacture and it is therefore a specialist product.
See our Starlink cranked pole install kits.
If a longer pole than 6ft is required it would have to be a larger diameter to maintain its strength and rigidity, e.g. a 2" pole of 2.0mm wall thickness would be OK up to about 10ft. Longer than that I'd be recommending a scaffold pole, approx 2" in diameter but with a 4mm wall thickness.....
A Mk3 Starlink will fit straight onto a 2" pole using a 2" version of the pole adapter, for a Mk1 or 2 :
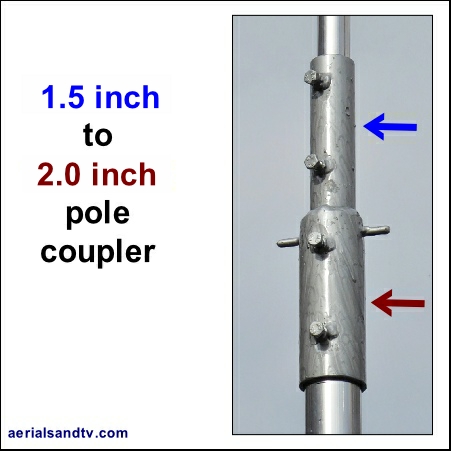
1 - Mount the Starlink Mk1 or Mk2 directly onto the 2" pole using a 2" to 1.5" pole coupler (the coupler's bolts can put small indents in the Starlink's pole but these are just superficial). Note the Starlink cable MUST be routed inside the pole. This would give a very strong sturdy install, or :
2 - Use the 2" to 1.5" pole couple to install a shorter length of slimmer 1.5″ pole to the top of a longer section of 2″ pole (think Eiffel tower ! ), then use a 1.5" pole coupler to clamp the Starlink Mk1 or MK2 onto the top of that.
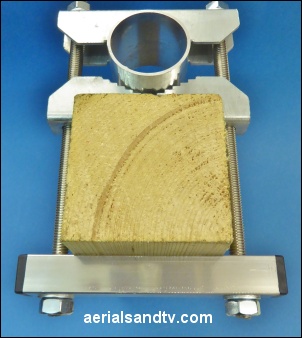
The alternative to a pole coupler or a "sleeved install" is a 2x2 pole clamp or a parallel clamp kit (available in galvanised at 2", 2.5", 3", 3.5" or 4", or stainless at 2") as in the adjoining pictures.
It will look a bit agricultural but has the advantage that the Starlink can be clamped to the top of any pole up to 4" in diameter. Normally we would recommend two (rather than just one) 2x2 clamps - and certainly two sets of the parallel clamp kits - to maximise the stability of the install. That said, even just one 2x2 would be stronger that the Starlink "genuine" pole adapter ! [link]
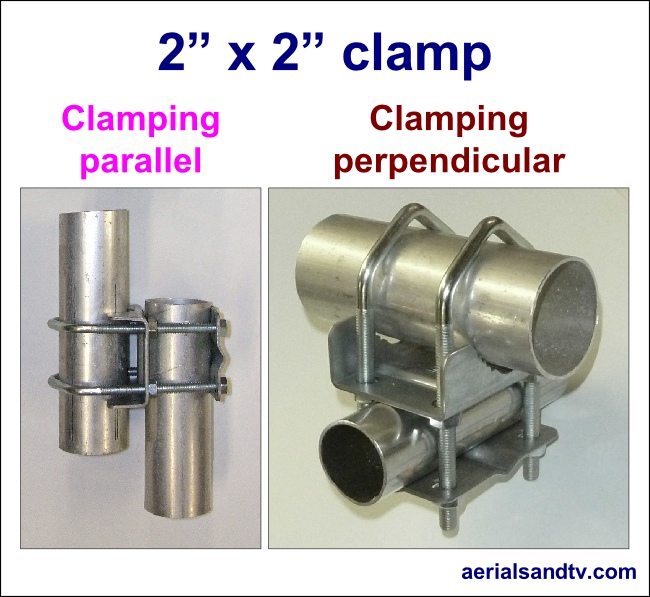
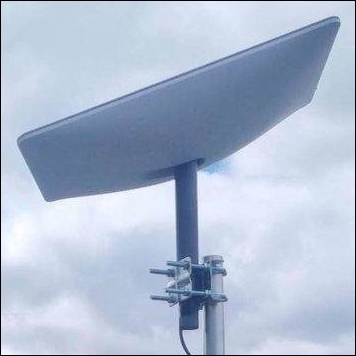
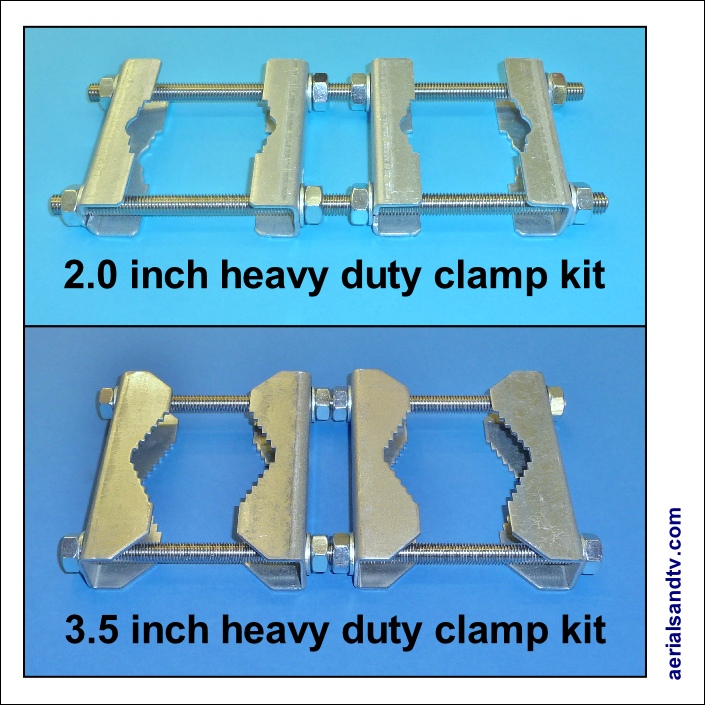
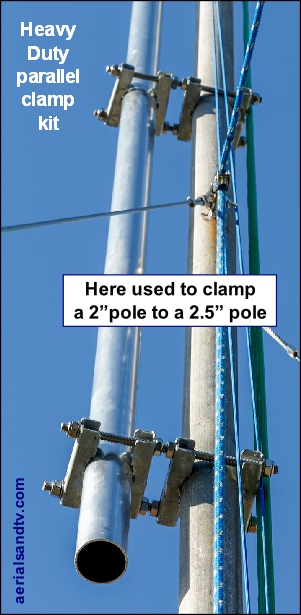
The clamp kits can be used in conjunction with 20x20 alloy to install a Starlink, or any pole, parallel with a box section up to 4" (using the 4" saddles, obviously).
None of our recommended mounts utilise the Starlink pole's "sprung pins" which are simply compressed inwards (out of the way), but that is good thing ! The idea of holding a satellite dish onto its mounting pole using "sprung pins" is unique to Starlink (other than satellite systems for caravans) and that has to tell you something..... In fact, apparently, "SpaceX advises that for maximum security and safety, a tether is recommended to keep the dish attached to the building". I was incredulous when I read that, I have never heard that advice for any aerial or satellite, ever. Have they really so little confidence in how sturdy their product is ? ! ?
In fact, a comment from one of our American customers is, I feel, apposite : I can’t believe Americans would spend $550 for a Starlink system, and then trust some little cheap plastic “peg” to hold the dish on the pole mount!!
So, basically, if it was me, I would not be relying on the "sprung pins" to keep your Starlink from, err, flying off.
[link]
Which pole and bracket(s) should I use for my Starlink installation ?
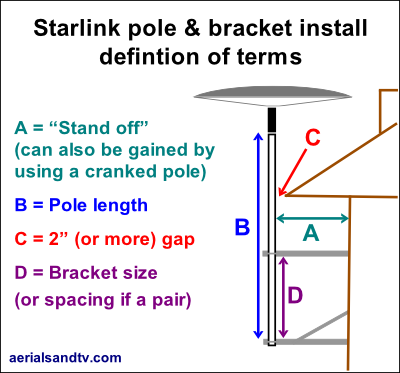
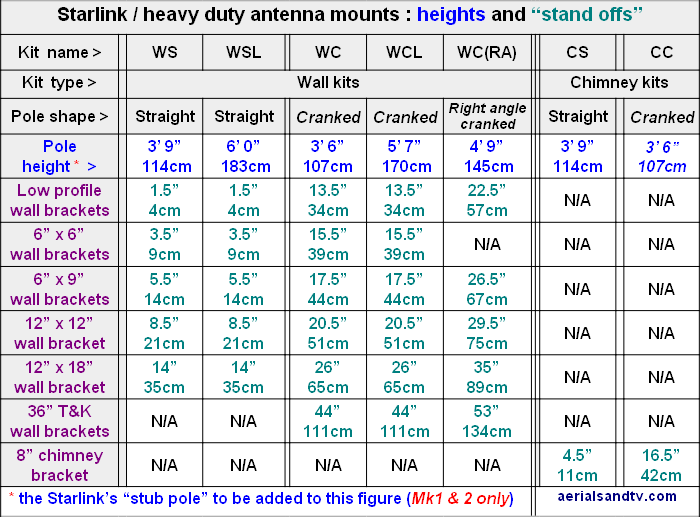
Fairly early on you need to decide the length of the pole (upon which you will install your Starlink) required to give you the necessary 100 degree clearance. Remember (for the MkI and MkII only) the Starlink's stub pole (approx 10 to 12") will be in addition to that height. You also need to ascertain how far out from the wall the pole needs to be in order to clear any fascia, this is the "stand off". The latter should include a 2 inch gap (or larger) to avoid any chance of the pole banging against the fascia and to facilitate any future maintenance of the latter. We recommend you get up there and check exactly what stand off you need before ordering your bracket (or kit) !
Will the install be on the wall or the chimney (as different brackets should be used for each) ?
Bear in mind that the Starlink, like any satellite dish, should be mounted as rigidly as possible, to minimise any movement caused by the wind. Thus the pole's brackets should be of the heavy duty type and/or spaced appropriately, plus the pole should be of sufficient diameter and wall thickness to minimise any flexing, see article on "satellite poles".
Remember ! : When using pairs of brackets the farther apart they are mounted the stronger the install will be.
All kits are available with or without a Starlink pole adapter
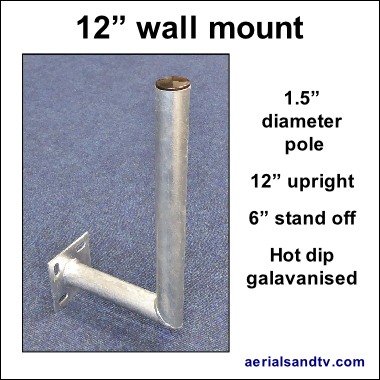
For installs which do not require a large stand off and are fitted near the top of a wall the 12" wall mount is a good choice.
It is strong and rugged but best of all, being hot dip galvanised, it is very resistant to corrosion.
The 1.5" diameter pole means both the Mk3 1.5" adapter will fit as well as the Mk2 / Mk3 / Starlink High Performance 1.5" coupler.
Pole length = 12" (30cm)
Stand off = 6" (15cm)
An alternative to brackets with a large stand off is, of course, the cranked pole, and they can look neater, but are only available in 1.5" diameter (or less). I have never seen a 2" diameter cranked pole.
However, in order to minimise movement of the Starlink installation, we would only recommend three cranked poles for it
4ft x 1.5" cranked pole
6ft x 1.5" cranked pole
6ft x 1.5" Right angle cranked pole
Plus the Supercrank or 10ft crank if cut down, maybe by 2ft?
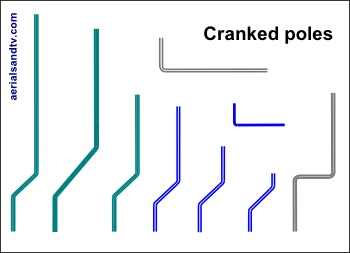
If using a Supercrank pole or a Right Angle crank consideration should be given to using saddles with the V bolts due to the higher twisting forces that would be imposed on the install (not required with low profiles brackets as they have saddle type clamps).
Obviously, all things being the same, the shorter the pole the less flex you will get in it. However, we are told, a small amount of movement does not affect the operation of the Starlink unduly. Shortening any pole will lessen flex, though it is always possible, if your luck is bad, your install might be at the resonant frequency pole !
The right angle crank will give most flex though even that is fine in the vast majority of instances. What you have to remember is that the only other option to get 32″ of stand off would be to use a straight pole with a pair of 36″ T&Ks, which are huge, unsightly and expensive......
Other useful articles for installing Starlink :
1 - Which bracket for which pole length ?.
2 - All about wall anchors.
3 - Installing brackets on metal clad buildings.
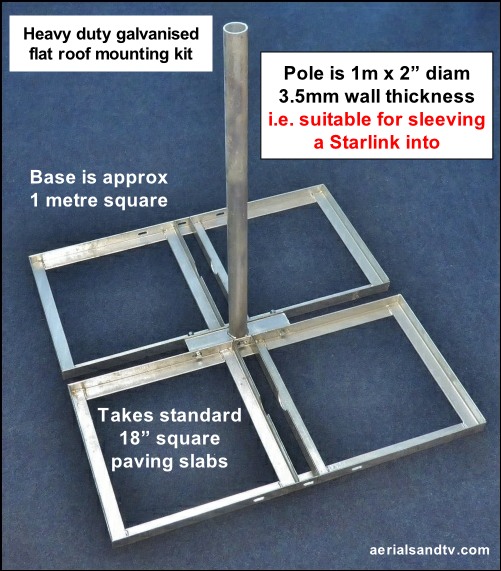
Mounting Starlink onto a flat roof is easy because our heavy duty flat roof mounting kit's pole is 2" diameter so (for teh Mk3 Starlink) the 2.0" pole adapter will fit straight on it.
For the Mk1, Mk2 or High Performance Starlink the stub pole just happens to be the right internal diameter (40mm) to sleeve a Starlink pole straight into but it must be said that using a 2" to 1.5" pole coupler is rather easier!
Size of hole needed for Starlink's ethernet plug
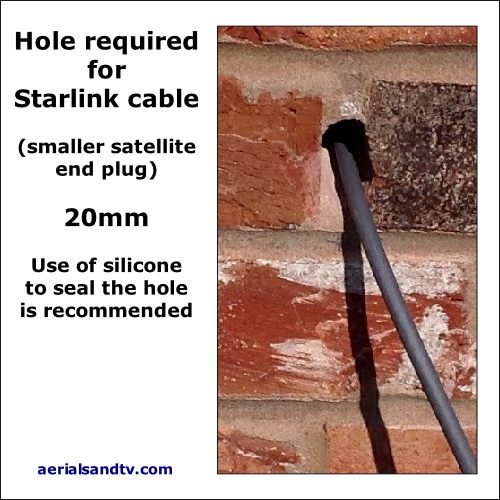
Generally, when you fit an aerial or satellite dish, you would only put the plug on after having routed the cable through the wall, thus the hole doesn't have to be that big (10mm would suffice). However, with Starlink, the plug is already on the "power over ethernet" (POE) cable and therefore you have to drill a hole of sufficient size for that to pass through. In fact the hole wants to be a bit bigger so as to ensure it gets through both walls (of a standard cavity wall) relatively easily with the minimum chance of damage.
The plug on the satellite end of the cable is smaller than that on the router end, so it makes sense to pass the cable out from inside of the building to the outside as a smaller hole can then be utilised. We would recommend a hole of 20mm in diameter, these size drill bits are not that expensive and reasonably easy to obtain. The plug may just about fit through a 18mm hole but it's a bit tight, thus increasing the chances of damage.
Pull the cable through the hole by feeding a welding rod (or similar) through it and taping the Starlink cable to that, then pull it through as gently as possible. Whatever the size of the hole don't forget to install a "drip loop" then, once the cable has been passed through, we recommend filling it with silicone to keep out the weather.
The size of the ethernet plug is also of relevance if sleeving a 1.5" pole (or the Starlink itself) into a scaffold pole : the securing bolt should be offset sufficiently to allow the plug to pass it !
The Starlink cable is about 100ft long.
Our thanks to R Holden for some of the information in this article.
See more tips when running cables. [Link]
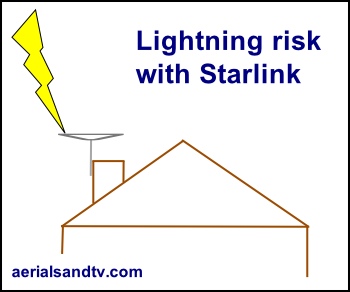
Starlink and lightning risk.
The fact is that the risk of lightning striking your house really is quite remote. More to the point, if your house does actually get struck by lightning it probably won't have been due to the Starlink being there, and the chances are that half your roof would get blown off anyway, so under those circumstances whether your Starlink has been damaged really would be the least of your worries…..
I would not have thought the lightning threat with Starlink is much different to that with TV aerials, so see lightning risk with TV aerials.