

Customers' Starlink installations
These customer reports of their Starlink installations are well worth a read as they can give you ideas as to your own job plus things to watch out for.
We are more than happy to add more customer install's to this page, please send them to us here.
Starlink installation on wooden cladding
Also see :
Installing Starlink on a longer pole.
Starlink install kits

Starlink Mk III - 3rd Generation dish.
For the purposes of installing a Starlink the most significant difference between the Mk 1/2 and MK 3 is that the latter does not come mounted on a short length of pole. As supplied it only has a "kick plate" (to stand it up at an angle when placed on the floor). Thus it requires a pole adapter plate if the dish is to be mounted on a pole. [Link]
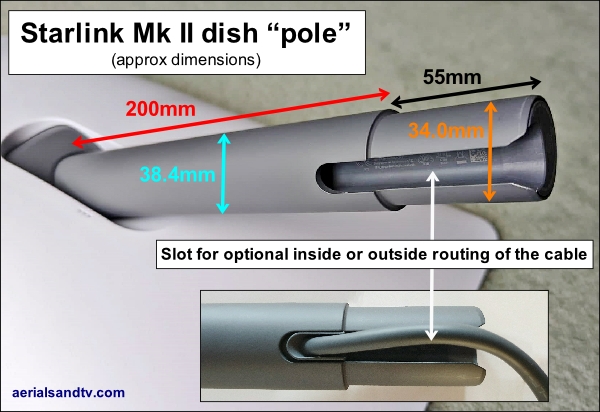
Starlink Mk II - 2nd Generation smaller oblong dish installs.
For the purposes of installing a Starlink the most significant difference between the Mk I and MK II is that on the latter the cable can run either inside or outside the pole. [Link]
Just a note to thank you for the Starlink mount which arrived promptly 48 hours after ordering. Your website is a goldmine of useful information and ensured I ordered the right bits, the first time!
I got it installed yesterday. It was a couple of hours work for this aerial novice, but the result is rock solid and the Starlink Dishy is very happy with its view of the sky.
We are in an exposed location with strong winter winds so I wanted a solid pole and mount. Yours succeeds with the pole and brackets, in particular the Mk3 pole adapter is much more substantial than either (a) the official Starlink one (lol) or (b) the cheap nonsense found on Amazon. I spray painted the pole and stand-offs, it's a shame the dish can't be too!
Please feel free to use the attached pic in your customer install gallery. Thanks again, Mike
Note, as Mike mentioned, he has painted the install black, as many customers seem to !

This install, undertaken by GC Contracting, was on a modern office with a large roof overhang. The only way to get the required stand off was to use an install kit with a cranked pole and 36" T&Ks !

Hi there,
I just wanted to say thank you for your product and information on your website.
It allowed me to set up my starlink (Mk2) myself on to my house with ease and confidence.
The quote for an engineer to do it was £480 so I have managed to save a great deal of money right before Christmas thanks to your product.
Regards S Kingdom
Wall installation kit with a 6ft straight pole and a 12x12 wall bracket.

Richard from Northern Ireland has provided a very useful summary of his install : I thought it might be useful to share some photos for your reference of my install (Starlink Mk2). I have the new rectangular dish, it’s worth noting that with the cable routed outside the pole the 4ft cranked aerial only fits over the first section of the stub before it meets the collar (i.e. it won’t slide over the entire aerial stub), thus running the cable inside the mast is to be recommended.
First you need to thread the PoE cable through the pole (the cable can’t sit on the outside as previously mentioned).
Next you need to insert the cable into the satellite dish pole so that it’s flush to the collar.
I then put the amalgamating tape around the recessed section to build it out (would need twice the length supplied ideally to provide an even level). We listen to customers (unlike some businesses....), so we now provide 1m of tape, though in fact the tape is not strictly speaking necessary with the MkII dish anyway as the cable can run inside the pole (thus leaving a longer length of pole to clamp onto).
The clamp then rests on the stub (need to ensure the cable sits between the protruding lugs so as not to pinch the cable.
Check that the cable isn’t snagged inside the lugs of the coupler to ensure it doesn't get squashed when the nuts are tightened up. Finally, line up the 4ft cranked pole into the clamp.
The ladder strap was a great piece of advice, I’m not good at heights so this made the whole job much easier.
I hope these are of use to you.
 dish install using a 1.5in pole coupler onto a 4ft crank 400W L10.jpg")
 dish install using a 1.5in pole coupler onto a 4ft crank 1000W L10")
 install in California USA")
Joel from California USA has some useful advice, especially this bit : I finally got the Starlink (Mk2) Antenna & router package. I’ve been able to use my Mesh Router with Starlink’s Ethernet adapter.
The Coupler worked well and the special Tape was excellent. I used a 40” section of 1 1/2” galvanized EMT (Metal Conduit) for the mast….only needed about 30” above the mast Bracket.
Thanks for your help ordering this ….
Here’s a few pictures of the installation. I used an abandoned gas water heater vent to bring the cable into the house and placed the routers on a shelf in the closet that now has a very small on demand electric water heater.
I get excellent coverage in and around the house with the Netgear Nighthawk mesh router. Compared with my my former satellite Internet connection I’ll save enough in a year to pay for the Starlink setup.

I am responding as a complete novice who has never attempted this sort of installation and would be wary of doing so. I started out looking for a pole and installer, but your website, staff and contributors inspired me to have a go and perhaps achieve a good result. I had seen a professional install I considered a bit crude and agricultural !
Just to say thanks to your amazing staff and website. The site gave so much information to prepare the install and the chat I had with your staff member, recommending the kit to use was crucial in that I would have made the wrong choice initially. He was most knowledgeable, patient and helpful in my getting it right.
Whoever drew up the kit spec is to be thanked. The kit had everything you could need, clearly drawn from experience but with a lot of care as well and the components so well designed and manufactured to high quality.
Your contributors were also a great help with special thanks to Richard from NI whose project and excellent photos helped so much during the assembly phase.
For the best installation position to my preferred router position required a longer run than 50ft so I ordered the 75ft cable from Starlink for the run through the garage and up to the roof.
The cable clips were excellent, placing them on the cable before nailing, as advised, certainly saved my fingers and thumb and made the task so much easier. A simple but essential tip, thanks.
My pole is mounted on wood cladded thermalite block. I used the resin solution recommended by one contributor to your site, choosing the R-Kem II and stud bolt solution. I cut my own long stainless steel bolts from rods to get longer studs and a secure fix into the thermalite. I used a non-standard technique, allowing the resin to exude from the holes behind the cladding board (they’re nailed on to vertical 2cm battens so the gap behind the boards means the boards would be stressed by movement of the bracket) this provided a packed stand-off behind the board. (I had considered ferrules but think this was the best solution for load distribution). It had been a big concern for me when deciding where to place the bracket. The boards themselves are very solid so combined with the stand-off resin it gave a good base for the bracket.
I also used 2x Screwfix black 2mm spacers to pack behind the top of the bracket to compensate for the board angle and spread the load.
I wanted to get the stand-off distance right round the eaves and gutter as advised so decided to assemble the pole onto the bracket and mark out the holes accurately for the right gap going using this assembly.
To do this I secured the ring bolt above the position, with a small rope loop through it and a small carabiner clip on the loop.I assembled the pole and bracket then secured a loop of rope onto the pole with a prusik knot. This knot, used in climbing, locks tight under load but allows slide if the load is momentarily released so I could do fine position adjustments for marking out whilst the knot took the weight.
Having marked the first hole, I drilled it and fixed the first stud bolt in place using the resin. Once set (a few minutes) I was able to secure the bracket in place with a non locking nut and mark out the remaining holes.
I drilled the remaining holes and resin fixed my stud bolts ( I only did one hole at a time as the resin sets within a few minutes) then hoisted the assembled pole and bracket and fixed temporarily in place to test the position. I used non-locking nuts at this stage.
Next I removed the assembly and at ground level assembled the dish onto the pole.
I must give special thanks to Richard from NI whose project and excellent photos helped so much during this final assembly phase. I was a bit baffled and would have struggled without his photos.
I have never used the amalgamation tape before, but what an amazing product it is. I found it to be most useful and later used some I purchased from Screwfix to protect the cable as it emerges from the bottom of the pole and where it is clipped to the bracket. Thanks to YouTube for explaining how to use it…
The clamp provided a very strong and neat connection to the dish, taking care as advised not to pinch the cable.
I was using the excellent scaffold tower I have for maintaining the cladding since ladders are ruled out for me (age).
https://www.laddersandscaffoldtowers.co.uk/acatalog/Home-Master-DIY-Scaffold-Towers.html so didn’t need the ring bolt for securing the ladder. This gives a huge advantage for working at height and also allows additional security with carabiners for the installer.
I used foam pipe insulation lengths cut to fit round the rim of the dish as a bit of protection for the hoist. I then rope hoisted the full assembly with a second anti-spin guide rope to the top of the scaffold.
I then used the same suspension method as before to take the weight whilst locating the assembly onto the studs and securing with the washers using nylon locking nuts this time, as per your kit, for the final fix. I had painted the bracket and lower section of the pole with black Hammerite to match the cladding.
For anyone wanting to hire a scaffold, before I bought my existing scaffold for a lengthy project, I had hired a 5.2 metre scaffold to reach the eaves for a roof moss clean. They can currently be hired for £110 per week including delivery and pick-up from
https://sab-supply.co.uk/products/agr-scaffold-tower-weekly-hire they provide an amazing national service (they source from local suppliers like HSS at reduced cost) they deliver and pick up on time/extend time if you wish and are most helpful. I recommend the AGR which allows security at each stage of the build. The scaffold is aluminium so easy for one man alone to assemble. I’m in my seventies and managed OK.
The Starlink dish and app self-homes the dish onto the best direction for reception, so what would be a specialist task is done automatically (though some customers have had issues with the app). The router updates it software and comes online. The pole gave unobstructed view of the sky, as reported by the Starlink app, and excellent Starlink performance as your staff predicted. The kit gives a neat install, the clamp method of securing the Starlink dish is well designed for the purpose.
I am now getting 20x improvement on download and upload speeds compared to my existing provider BT. The service in rural Kent is very poor. I have passed your website details to my neighbours who are now interested. So finally thanks again so much for all your invaluable help to deliver a neat and effective solution and to all your contributors and staff. Roger from Kent

Here is R Holden's Starlink install on a chimney. Note this is a wall install on a chimney which is not normally advised but could be used here because :
1 - It is a large chimney with the install a fair way down it (i.e. plenty of weight of masonry above it)
2 - The use of two Low Profile Brackets spreads the load over many bricks.
Interestingly the Starlink apparently works fine with the TV aerial within its 100 degree viewing cone !
I found the aerialsandtv.com Starlink page was full of very useful information and tips. Do also visit the rest of the site - there are some very relevant details.
Here's what I learnt whilst fitting my Starlink using one of ATV's kits
1. Decide on the location and attachment of satellite dish
consider:
a. direction of satellites and the direction the dish will adopt - use the app
b. there needs to be sufficient space around dish to allow it to manoeuvre
c. cable routing from dish to entry point
2. Decide on cable entry point
consider:
a. required position of cable inside building - positioning of modem
b. running of cable from dish to entry point and the use of a drip loop
c. the satellite connector will just pass through a 18mm hole. It is better to use a 20mm masonry drill bit which is available with a straight shank for use in a regular drill. Cost about £10.00.
3. Remember:
a. the excessive length of the cable and that both ends have appropriate connections already attached and that these cannot be removed
b. the 'satellite end' has the smallest diameter and therefore the cable ideally should be routed from inside the building to the outside; refer to 2c above.
4. Position and attach the wall brackets to support the pole and dish.
5. Drill cable route through the wall.
6. Route cable through wall from inside to the outside and then through the supporting pole to the dish.
7.Assemble the pole and satellite coupler remembering to attach cable to the dish and to ensure the cable is not damaged
8.Attach the pole and satellite assembly to the wall brackets.
9.Route cable - remembering the drip loop prior to drawing the excess cable through the wall.
10.Consider the use of a silicone filler to close off the wall entry/exit
11.Consider the use of an exterior "blown brick" cover over the entry point
12.Consider the use of a 'cable tidy box' to gather together the excess of cable.
13.To protect the cable on it's exit from the bottom of the pole debur the inside of the pole and then consider using 15mm water pipe insulation sleeving around the cable and pushed up inside the mast.
Hey there, just wrapped the mast and Starlink install last night on our new cabin build, everything worked great! See attached pictures… We are a certified Cerakote applicator so I had all the parts coated black, looks pretty cool… Cheers Derek.
This highly customised kit was sent to (and installed in) Canada. It was the first shortened kit we sold, in fact it was Derek's idea to shorten the pole (so we could then send the kits internationally) !
Note how Derek has painted the install black and also applied his own "SpaceX" stickers.

I took pictures at most stages, hopefully it should give you enough to share and give others a few ideas.
The install is relatively straight forward and no real hurdles. The main challenges people might hit are in terms of accessibility for where they are placing it. Given it needs a clear unobstructed view it's likely to be going on / near the roofline and getting access up there might be a little difficult. I was fortunate enough to have some scaffolding onsite an the time, so it was easy enough for me to use that. I think if I only had a ladder for access it would be a little more challenging, especially as it was easier to have a second pair of hands (the dish is a little heavy and awkward). Only other thing you need is a decent sized drill bit bit to get the cable through the wall as it comes pre-terminated. Thanks Paul Rae
Paul fitted one of our Starlink install kit and it will be noted Paul then painted it black, very neat I'm sure you'll agree. His point about the hole for the cable / plug is well made, see article.

The Starlink Install went very well thanks to your excellent article on your website which gave me all the info I needed. I installed it on the side of my garage as per the attached photos. I guess it looks a little agricultural but it was a DIY job after all.
The only issue encountered was that it is quite heavy and so it was easier to attach the dish to the pole before climbing the ladder! Also, given my garage is made with thermalite blocks I needed to use resin bonded anchors for the brackets and I chose two K style brackets for extra strength, don't know if this was really necessary but I feel happier this way. Could have used a shorter pole but this gives me scope to raise it if needed. Regards Charles Warwick
Charles did the right thing installing the Starlink on the pole before installing the pole, that is the way all aerial installers would do it with almost all installs. When doing this install Charles had an awkward distance from the wall to the edge of the gutter to contend with. We normally recommend that poles are at least 2" from the fascia but the problem here is that the next size up brackets wise from 24" T&Ks are 36" ones, and they are large to put it mildly as well as being heavy to man handle.
Available brackets standoffs are : 3.5", 5.5", 8", 14", 20" and 32"

Here’s a brief write up of my experience with pics. It all went great, up and running really quickly. The Starlink install kit (cranked pole and brackets) is excellent and high quality. No additional adaptors or fittings are required - everything needed is supplied in the kit. I sprayed the cranked pole with a matt black spray paint. My original plan was to install it myself, but in the end I used a local TV/Satellite installer as I wasn’t confident climbing up ladders that high. Thankfully, there’s some nice experienced TV/Satellite engineers local to me that can make this look easy. Pole is nice and secure. Good clearance of the roof and no obstructions. It didn’t take long to get up and running. I ran the cable into my loft and then internally down into my home office. I couldn’t be happier - finally I have high speed internet at over 300 Mb (a huge increase over the 6Mb I had with Openreach!).
Finally fast internet! Totally blown away by Starlink - it really has been a game changer!
Most installers should be happy to fit a Starlink, after all it's quite straightforward other than the pole attachment but the pole coupler and 1.5" cranked pole sorts that out. All they need to know is that it should have a clear view of a 100 degree cone of the sky, and it doesn't matter which direction the dish faces as it's self aligning !
Care in the use of ladders is always wise so one cannot be too critical of Lee, however all our kits (the aerials kits as well as the Starlink kits) come with a screw eye which makes using ladders much safer.

I ordered all the kit I needed for my Starlink installation from ATV, their extensive website gave me a great insight into what I had in store. The next day Justin from ATV called me out of courtesy to try and understand my intention as the order looked a little out of sorts to him. We had a chat and I had indeed ordered too many U-bolts and I possibly needed another wall bracket but may get away with it so I didn't bother. It was good to talk to a vendor who actually cared about me getting the right kit to do the right job. The day of the installation I popped into Wickes for some 10mm Rawlbolts and cable clips. I decided to put the dish near to the apex of my roof line, luckily I own a large three stage extension ladder so I was good to go. After a bit of measuring I marked up for the 16mm holes (rawlbolt diameter) for my wall mounting bracket and drilled the holes. I then attached the rawlbolts to the wall bracket and pushed them home into the drilled holes. I used my socket set to tighten up the bolts after which the mount was very securely fixed in place. I next mounted the Starlink dish to the cranked pole with the pole coupler and zip tied the cable part way down the pole. The pole was heavy and a little cumbersome but I managed to get the end of it through the one U-bolt I'd pre-attached to the wall bracket. I then altered the angle and height of the pole until I was happy, added the second U-bolt and tightened them both up. After zip tying more of the cable to the pole I then used the cable clips to fix the cable to the wall, this proved the most difficult thing to do as my mortar and bricks were so very hard! (if necessary drill small holes in the mortar or bricks, then bash in tight wooden plugs before hammering the clip nails into them) Having done the install I plugged in the Starlink router and was online within minutes. After surveying the work afterwards I noticed a small wobble on the dish, it wasn't a great problem but I thought it may cause an issue if the wind got up, Justin from ATV was right, I did indeed need two wall mounting brackets! I went back on ATV's website and ordered another bracket and pair of U-Bolts. The kit turned up the next day and I was able to finish the job! Many thanks to Justin for the great products and service, I will be recommending ATV to my friends, I just wish I'd gone with his first suggestion of having two brackets, Regards Richard.
Nice install Richard. As regards tie wraps for the cable tape is usually used by aerial installers for these reasons.
